PernixData FVP in my lab. Part 1 – Preparation
In this multi-part article series, I’ll explain how I configured my lab and how simple is the installation and configuration process to implement PernixData FVP.
If you would like to read the other parts in this article series please go to:
- PernixData FVP in my lab. Part 2 – Installation
- PernixData FVP in my lab. Part 3 – Configuration
- PernixData FVP in my lab. Part 4 – Performance
In this days I’m involved in the process of testing PernixData FVP in my lab.
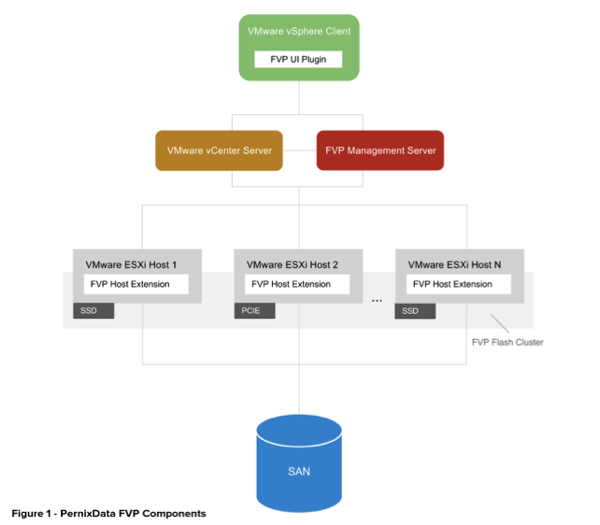
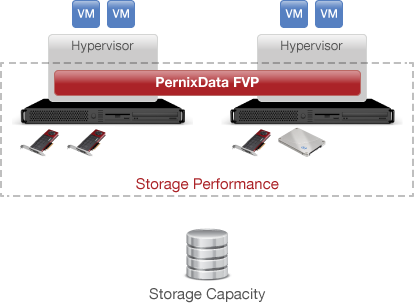
FVP is a software layer that need to be installed on the Hypervisor.
It use SSD disks or PCIe Flash storage as a Read and Write cache in between the host and the storage.
PernixData FVP is here to solve the storage I/O bottleneck.
There are a lot of article out there that explain how he works, especially from Frank Denneman, Technology Evangelist at PernixData. These are a few links.
http://frankdenneman.nl/2013/06/18/basic-elements-of-the-flash-virtualization-platform-part-1/
This will be a multi part article. In this part 1, I want to expose the operation that I did to prepare my environment.
First of all a description of the lab.
Lab Architecture
- Hosts: 2 x DL380 G7 – 1 CPU Quad Core – 24 GB ram
- SSD: 2 x Intel 530 180 GB
- Shared Storage: 3 x Hp StorVirt VSA 2 TB total.
- Shared Storage: 1 x Sun StorageTek 6140 sata
- Switch: 1 x Hp ProCurve 2510-24G
- Hypervisor: ESXi 5.1 boot from USB.

Preparation
Before installing the PernixData software, you need to prepare the environment. Volume raid creation and SSD presentation to ESXi.
Volume Raid.
The Hp DL380 G7 is shipped with an integrated Smart Array P400i raid controller with a 256 MB cache upgradable to 1 GB. This type of controller is not the best choice for a Flash acceleration software like FVP, but you can optimize the performance following the best practices indicated in this articles:
http://blog.pernixdata.com/with-ssd-controller-cache-is-not-king/
An except of the Hp document:
If BBWC or FWBC is installed then for the current generation of SSD’s and Smar Array, it is recommended that you do NOT enable the array accelerator for the SSD’s logical volume. This is the most likely setting for the best all around SSD performance but is highly dependent on the specific application.
You need to create jbod or raid 0 “Logical Drive”, disable the controller cache, and finally enable the disk write cache. All this operation are performed using the Hp array configuration utility aka “hpacucli”.
By default, with only 1 SSD drive connected, the Smart Array P410i configure a single Raid 0 “Logical Drive”.
SSH to the host, Run hpacucli and verify the array configuration:
~ # /opt/hp/hpacucli/bin/hpacucli
=> ctrl all show config

Verifying the controller cache before disabling.
=> ctrl slot=0 logicaldrive 1 show
 Disabling the cache:
=> ctrl slot=0 logicaldrive 1 modify arrayaccelerator=disable
Finally you need to enable the disk write cache.
=> ctrl slot=0 modify dwc=enable forced

Important Note: Enable Disk write cache only if your SSD have a onboard super-capacitors that keep disk components powered long enough to flush the contents of volatile memory to persistent flash. Most of “enterprise class” SSD have it.
SSD presentation:
Some times and with some SSD drives, ESXi don’t detect this devices as real SSD. See the pic below.

What you need to do, is marking this HDD as SSD. There is an official VMware KB with all the steps for doing so. http://kb.vmware.com/kb/2013188
Another useful post is on the William Lam blog. http://www.virtuallyghetto.com/2013/08/quick-tip-marking-hdd-as-ssd-or-ssd-as.html
However this ares the step that I did.
1. Identify the device to be tagged as SSD
# esxcli storage nmp device list

2. Run this command to add a PSA claim rule to mark the device as SSD:
# esxcli storage nmp satp rule add --satp VMW_SATP_LOCAL --device naa.600508b1001030374538364132300c00 --option "enable_ssd"
3. Run this command to unclaim the device:
# esxcli storage core claiming unclaim --type device --device naa.600508b1001030374538364132300c00
4. Run these commands to reclaim the device:
# esxcli storage core claimrule load
# esxcli storage core claiming reclaim -d naa.600508b1001030374538364132300c00
# esxcli storage core claimrule run
5. Run this command to check the SSD status:
# esxcli storage core device list -d naa.600508b1001030374538364132300c00

Important Note: DO NOT create datastore or format the device with VMFS. Flash devices must be clear of existing partitions before they can be added to a PernixData Flash Cluster. See VMware KB 1036609 for additional instructions on deleting existing partitions.
This concludes part 1 of this multi-part article in which I explained how I configured my lab. In the next part 2, I will show you how to install PernixData FVP in your VMware vSphere cluster.
If you would like to read the other parts in this article series please go to:
- PernixData FVP in my lab. Part 2 – Installation
- PernixData FVP in my lab. Part 3 – Configuration
- PernixData FVP in my lab. Part 4 – Performance
About The Author
fbonetti
I'm currently working as a Solution Architect, Sr. System Engineer, Virtualization Specialist at RTC S.p.A. where I'm mainly focused in the design, implementation and support of the virtual infrastructures. My skills include storage, backup, disaster recovery, network and firewall.